In the realm of modern web application development and security, robust gateway solutions are imperative to protect sensitive data and ensure secure access. Nginx, a high-performance web server and reverse proxy, coupled with Keycloak, an open-source identity and access management solution, forms an exceptional duo that fortifies gateway security with its comprehensive features and seamless integration capabilities.
Nginx: Powerhouse in Web Serving and Proxying
Nginx stands as a stalwart in the world of web serving and proxying. Renowned for its efficiency in handling high loads, Nginx serves as a reverse proxy, load balancer, and HTTP cache, excelling in its ability to efficiently distribute traffic across servers while providing robust security features.
Key Features of Nginx:
- Load Balancing: Distributes incoming traffic across multiple servers to improve reliability and scalability.
- Reverse Proxy: Acts as an intermediary between clients and servers, enhancing security and performance.
- Caching: Caches frequently accessed content to improve response times and reduce server load.
- SSL/TLS Termination: Handles encryption and decryption of SSL/TLS connections, ensuring secure data transfer.
- Web Server Capabilities: Efficiently serves static and dynamic content with high performance.
Keycloak: Empowering Identity and Access Management
Keycloak emerges as a frontrunner in the realm of identity and access management (IAM), offering a robust suite of features to authenticate, authorize, and manage user identities across applications and services.
Key Features of Keycloak:
- Single Sign-On (SSO): Enables users to access multiple applications with a single set of login credentials.
- Identity Federation: Integrates with various identity providers, allowing seamless authentication across platforms.
- Role-Based Access Control (RBAC): Manages user roles and permissions to control access to resources.
- Social Login Integration: Supports authentication through social media platforms like Google, Facebook, etc.
- User Self-Registration and Management: Allows users to register, reset passwords, and manage their profiles.
Implementation and Best Practices
The integration process involves configuring Nginx to act as a reverse proxy and delegate authentication to Keycloak using appropriate modules or plugins. Implementing this integration requires careful consideration of security practices, including secure communication between Nginx and Keycloak, proper user session management, and adherence to access control policies.
How might you ensure the security of your backend?
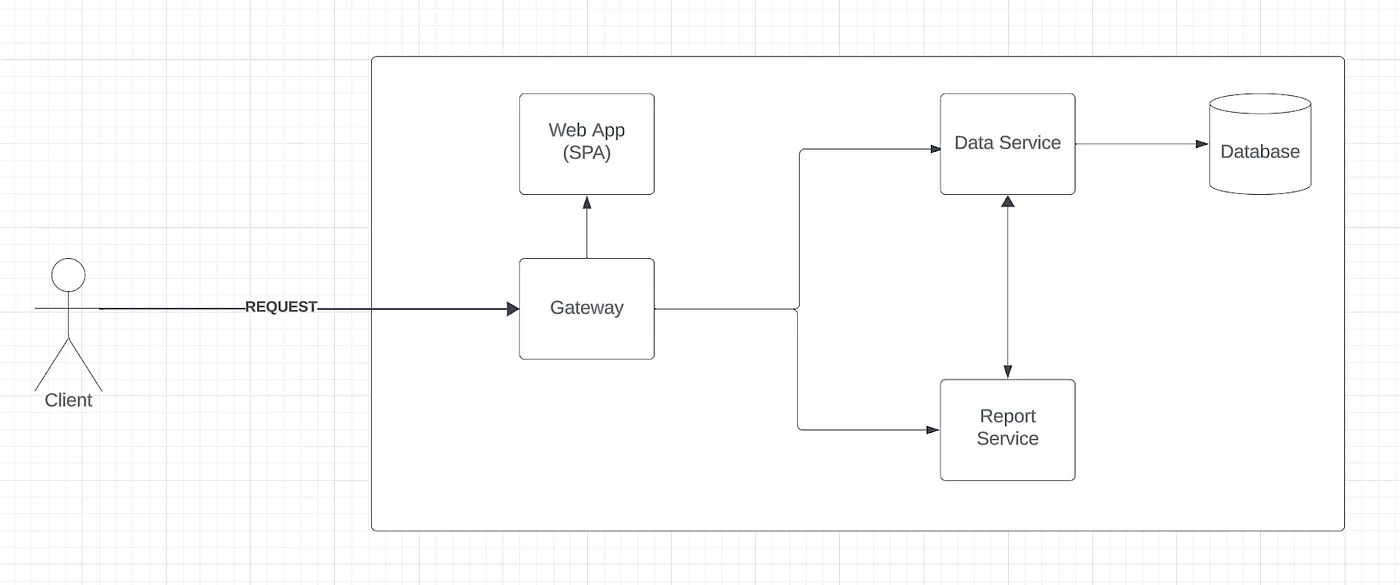
Picture this: we’re crafting a web application consisting of three integral parts:
- A single-page application (SPA) constructed using frameworks such as React or Angular.
- A Data Service responsible for managing CRUD operations concerning our domain entities and facilitating the database connection.
- A Report Service tasked with retrieving data from the Data Service and housing the logic for creating tailored reports.

When it comes to securing the backend, there are three primary strategies to consider:
- Each microservice handles its own authentication and authorization.
- The gateway manages authentication while individual services are responsible for authorization.
- The gateway takes care of both authentication and authorization.
Modernized architecture
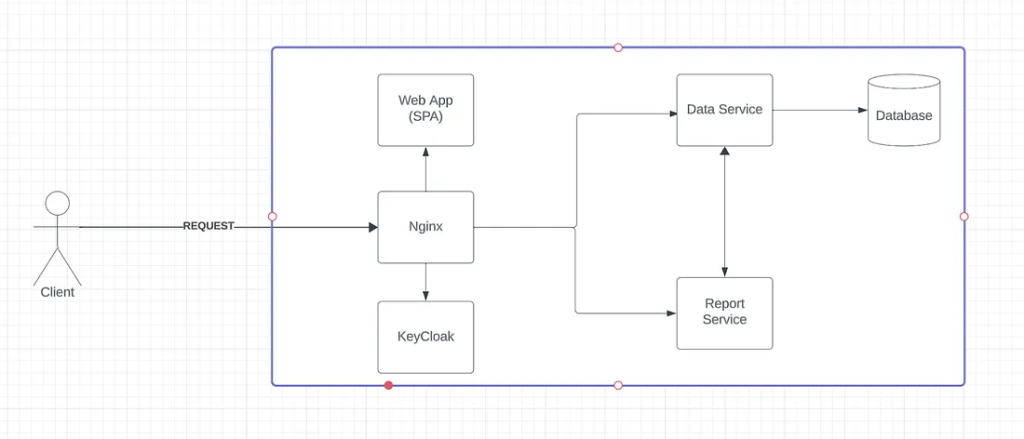
Let’s make some adjustments to our architecture. The updated version is depicted in the image below.

As illustrated, the Nginx service now functions as an API Gateway. Its primary role is to handle both authentication and authorization. Meanwhile, the Keycloak service acts as our Single Sign-On (SSO) server. The Data Service and Report Service process requests coming from Nginx, but they no longer manage authentication or authorization for these requests.
How should we handle authentication in this scenario? We can use nginx authentication proxy.
Now, let’s examine the nginx configuration:
http {

  ...

  location /auth {
     proxy_ssl_server_name on;
     proxy_pass  https://targpatrol-keycloak.local/realms/targpatrol-dev/protocol/openid-connect/userinfo;
     proxy_pass_request_body off;
     proxy_set_header Content-Length "";
     proxy_set_header X-Original-URI $request_uri;
  }

  location /data {
     auth_request /auth;
     auth_request_set $auth_status $upstream_status;
     error_page 401 = @handle_unauthorized;

     proxy_pass http://data-service.local;
     include /etc/nginx/common/ssl-headers.conf;

     js_content authService.authorize;
  }

  location /report {
     auth_request /auth;
     auth_request_set $auth_status $upstream_status;
     error_page 401 = @handle_unauthorized;

     proxy_pass http://report-service.local;
     include /etc/nginx/common/ssl-headers.conf;

     js_content authService.authorize;
  }
}
What’s going on in this setup? Initially, we’ve established the /auth route, which authenticates our request using Keycloak. By sending a request solely with headers to Keycloak, we seek user information. Upon possessing a valid token in our header, Keycloak responds with a 200 OK, furnishing the current user’s data.
The routes pertaining to the Data and Report services include the ‘auth_request’ directive. Whenever we endeavor to access them, a request is initiated to Keycloak in the first instance.
Understanding the authentication process is crucial, but what about authorization? Here’s where we can utilize a feature within nginx known as ngx_http_js_module. This module enables the execution of JavaScript code during a request. Let’s dive into the ‘js_content’:
function extractPayload (token) {
   const tokenParts = token.split('.');
   const encodedPayload = tokenParts[1];
   const decodedPayload = Buffer.from(encodedPayload, 'base64').toString('utf-8');

   return JSON.parse(decodedPayload);
}


function authorize(request) {
   const token = request.headersIn.Authorization;

   if (!token || !(token.slice(0, 7) === 'Bearer ')) {
       return false;
   }

   const payload = extractPayload(token);
   const roles = payload['roles'];

   # request url
   const url = request.uri;


   # here we can compare url and roles
   # to allow or deny access

   return false;
}
The file, named authService.js, is intended to house a function named ‘authorize.’ In our js_content directive, we refer to it as authService.authorize (following the format fileName.functionName). We’re using plain JavaScript for this purpose. The initial step involves parsing the Authorization header to extract the Bearer token, generated by Keycloak, into an object format. Subsequently, we match the roles with the request URL to determine whether to grant or deny the request. It’s a fairly straightforward process!
However, a challenge with this method is that each request is routed to Keycloak. An alternative solution involves transitioning from nginx’s js_content to a Node.js service (or another suitable language) that integrates server-side with Keycloak. It’s important to note that only Nginx Plus supports this feature, not the free version. For more detailed information, please refer to Keycloak’s documentation.
Conclusion
Nginx and Keycloak form an ideal partnership, combining Nginx’s prowess in web serving and proxying with Keycloak’s robust identity and access management capabilities. This integration not only fortifies gateway security but also streamlines authentication and authorization processes, enhancing both user experience and application security in an increasingly interconnected digital landscape. By implementing this duo, organizations can establish a robust security gateway that safeguards sensitive data and ensures secure access for their users.
Complete the form located at this page https://synpass.pro/contactsynpass/ in order to get in touch with us regarding your project☝

