Sending emails through your PHP applications is often essential, whether for user registrations, newsletters, or notifications. However, a common problem developers face is emails landing in the recipient’s spam folder, which can severely impact the delivery rate and user experience. One effective way to avoid this is by using SMTP (Simple Mail Transfer Protocol) to send emails via PHP.
◈ Why Emails End Up in Spam
Before diving into SMTP, it’s important to understand why emails get marked as spam. Here are the most common reasons:
- Lack of Authentication: Many spam filters check for proper authentication mechanisms like SPF, DKIM, and DMARC. Without these, your email may be flagged as untrustworthy.
- Server Blacklisting: If your IP address or server domain is blacklisted, emails may go to spam automatically.
- Low Sender Reputation: Spam filters evaluate the sender’s reputation based on previous email campaigns, open rates, bounce rates, etc.
- Content: Spammy keywords or phrases in the subject line or body, excessive links, and poor HTML can all trigger spam filters.
To mitigate these issues, using PHP SMTP Mail Sender is one of the most reliable approaches.
◈ What is SMTP?
SMTP is the protocol used for sending emails across the internet. Unlike the default mail() function in PHP, which sends emails directly from your server, SMTP connects your application to a mail server that handles the email delivery.
This method is better because it offers:
- Authentication: SMTP allows you to authenticate with a username and password, making your emails more likely to be trusted by receiving mail servers.
- Proper Email Headers: SMTP ensures that important headers like
From,Reply-To, andReturn-Pathare correctly set, making your email look legitimate. - IP Reputation: If you’re using a third-party SMTP service like Gmail, Mailgun, or SendGrid, they have high-reputation IP addresses, reducing the chance of your emails being marked as spam.
Let’s Code!
To use PHP’s SMTP mail sender, download the PHPMailer library here.
First, create an HTML form to collect information from the user:
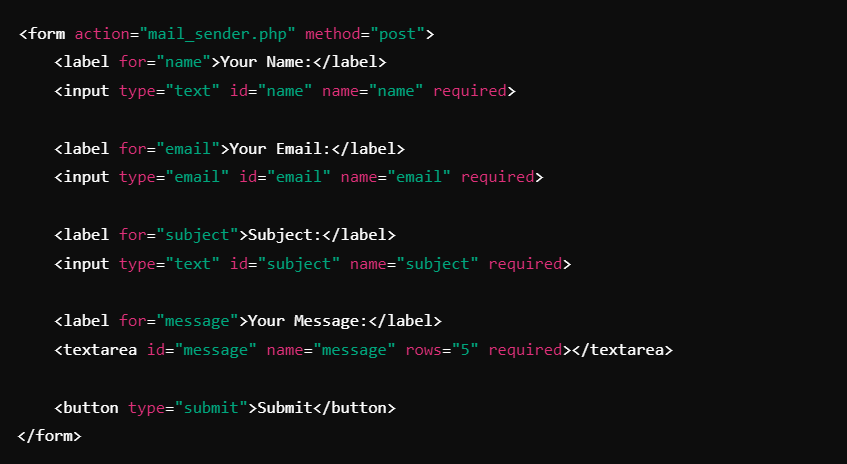
This form collects user input such as name, email, subject, and message, and sends the data to mail_sender.php for processing.
◈ Configuring mail_sender.php
<?php

use PHPMailer\PHPMailer\PHPMailer;

require 'phpmailer/src/Exception.php';
require 'phpmailer/src/PHPMailer.php';
require 'phpmailer/src/SMTP.php';

if ($_SERVER['REQUEST_METHOD'] == 'POST') {

    $name = $_POST["name"] ?? null;
    $email = $_POST["email"] ?? null;
    $message = $_POST["message"] ?? null;
    $subject = $_POST["subject"] ?? null;

    if (empty($email) || empty($name) || empty($message)) {
        echo json_encode(['response' => 'error', 'message' => "Please fill all fields."]);
        return;
    }

    $mail = new PHPMailer();
    $mail->isSMTP();
    $mail->SMTPDebug = 0;
    $mail->SMTPAuth = true;
    $mail->SMTPSecure = 'ssl';
    $mail->Port = 465;
    $mail->Host = 'your-mail-host.com';
    $mail->Username = '[email protected]';
    $mail->Password = 'password';

    $mail->setFrom('[email protected]', 'Sender Name');
    $mail->addAddress('[email protected]', 'Recipient Name');
    $mail->Subject = $subject;
    $mail->isHTML(true);
    $mail->Body = $message;

    if ($mail->send()) {
        echo "Email sent successfully!";
    } else {
        echo "Error sending email: " . $mail->ErrorInfo;
    }
}
?>
Here’s what’s happening in the code:
- PHPMailer Setup: We first include the PHPMailer library.
- Data Handling: We assign form data (name, email, message, subject) to PHP variables and check for missing fields.
- Email Sending: We configure PHPMailer with the SMTP server details, add recipient and sender addresses, and send the email.
Enhancing the Email with a Template
To create a more visually appealing email, you can use HTML templates. Here’s an example:
$mail_template = '<table width="100%" bgcolor="#F5F5F5">
    <tr>
        <td>
            <table width="100%" max-width="600px" bgcolor="#FFFFFF" style="margin:0 auto;">
                <tr>
                    <td style="font-size: 36px;">' . $subject . '</td>
                </tr>
                <tr>
                    <td>Name: ' . $name . '</td>
                </tr>
                <tr>
                    <td>Email: ' . $email . '</td>
                </tr>
                <tr>
                    <td>Message: ' . $message . '</td>
                </tr>
                <tr>
                    <td>Email Sent: ' . date("F j, Y, g:i a") . '</td>
                </tr>
            </table>
        </td>
    </tr>
</table>';

$mail->Body = $mail_template;
Final Steps
Finally, add the HTML email template to the body of the email:

Congratulations! You’ve now sent an email using PHP and SMTP. If you need to extend this functionality, consider wrapping the code into a function to send bulk emails or automate the process.
Fill out the form on the following page: https://synpass.pro/contactsynpass/ to contact us regarding your project ☝

